Windows 上配置 Git SSH
https://support.atlassian.com/bitbucket-cloud/docs/set-up-an-ssh-key/
0x01 Set up SSH for Git on Windows
Use this section to create a default identity and SSH key when you’re using Git on Windows. By default, the system adds keys for all identities to the /Users/<username>/.ssh directory.
Step 1. Set up your default identity
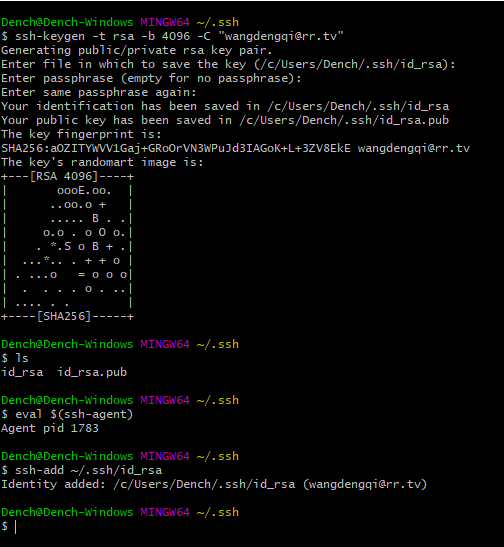
From the command line, enter ssh-keygen.
ssh-keygen -t rsa -b 4096 -C "email"
List the contents of .ssh to view the key files.
1 | dir .ssh |
Step 2. Add the key to the ssh-agent
If you don’t want to type your password each time you use the key, you’ll need to add it to the ssh-agent.
1 | eval $(ssh-agent) |

Step 3. Add the public key to your Account settings
Open your .ssh/id_rsa.pub file and copy its contents.
From Bitbucket, Paste the copied public key into the SSH Key field. Click Save.
Step 4. Test connection
Return to the command line and verify your configuration and username by entering the following command:
1 | ssh -T git@bitbucket.org |
0x02 Working with non-default SSH key pair paths
If you used a non-default file path for your GitLab SSH key pair,
you must configure your SSH client to find your GitLab SSH private key
for connections to your GitLab server (perhaps gitlab.com).
For OpenSSH clients this is configured in the ~/.ssh/config file.
Below are two example host configurations using their own key:
1 | GitLab.com server |
0x03 使用ed25519方式生成SSH秘钥
如果使用rsa加密方式,出现秘钥无效,依旧提示输入用户名密码验证,请通过ed25519加密方式,生成ssh秘钥。
ssh-keygen -t ed25519 -C "email" -b 4096
对应生成的私钥 id_ed25519 和公钥 id_ed25519.pub, 其他配置步骤同rsa生成方式一致。
