自定义ImageSpan之行居中显示

自定义 ImageSpan 之行居中显示
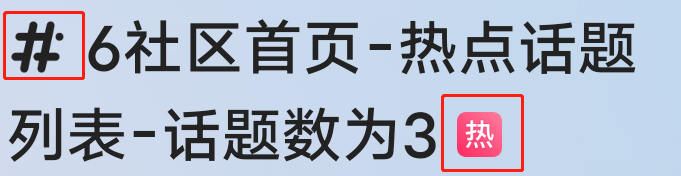
image-20220104185114603
1
2
3
4
5
6
7
8
9
10
11
12
13
14
15
16
17
18
19
20
21
22
23
24
25
class CenteredImageSpan(context: Context, drawableRes: Int) : ImageSpan(context, drawableRes) {
override fun draw(
canvas: Canvas,
text: CharSequence,
start: Int,
end: Int,
x: Float,
top: Int,
y: Int,
bottom: Int,
paint: Paint
) {
// image to draw
val b = drawable
// font metrics of text to be replaced
val fm = paint.fontMetricsInt
var transY = ((y + fm.descent + y + fm.ascent) / 2 - b.bounds.bottom / 2)
// to check the last line.(当 image 在单独一行显示时可能会存在这个问题)
if (transY > bottom - b.bounds.bottom) transY = bottom - b.bounds.bottom
canvas.save()
canvas.translate(x, transY.toFloat())
b.draw(canvas)
canvas.restore()
}
}
1
2
3
4
5
6
7
8
9
10
11
val spanStr = SpannableStringBuilder()
spanStr.append("# ")
spanStr.append(title)
val imageSpan = CenteredImageSpan(this, R.mipmap.ic_topic_detail_jinghao_black)
spanStr.setSpan(imageSpan, 0, 1, Spannable.SPAN_EXCLUSIVE_EXCLUSIVE)
// corner
spanStr.append(" #")
val len = spanStr.length
val cornerSpan = CenteredImageSpan(this, R.mipmap.ic_topic_detail_remen)
spanStr.setSpan(cornerSpan, len - 1, len, Spannable.SPAN_EXCLUSIVE_EXCLUSIVE)
binding.ctTalkDetailInfo.talkNameTv.text = spanStr

FileProvider 的使用

FileProvider 的使用

Dev Doc

https://developer.android.google.cn/reference/androidx/core/content/FileProvider

0x01 定义一个FileProvider

在 androidx 包提供的 FileProvider 提供了 生成文件Uri 的功能。

在 manifest 文件中,声明一个 provider

1
2
3
4
5
6
7
8
9
10
11
12
13
14
15
16
17
18
<manifest>
...
<application>
...
<provider
android:name="androidx.core.content.FileProvider"
android:authorities="${applicationId}.fileprovider"
android:exported="false"
android:grantUriPermissions="true"
tools:replace="android:authorities">
<meta-data
android:name="android.support.FILE_PROVIDER_PATHS"
android:resource="@xml/file_paths"
tools:replace="android:resource" />
</provider>
...
</application>
</manifest>

0x02 可用文件路径配置

在 res/xml/file_paths.xml 下配置可用的文件路径,FileProvider 只能生成配置了的文件Uri。每个你想要生成Uri的文件路径都需要在 paths 下面定义。

1
2
3
4
5
6
7
8
9
<paths xmlns:android="http://schemas.android.com/apk/res/android">
<files-path name="my_images" path="images/"/>
<cache-path name="name" path="path" />
<external-path name="name" path="path" />
<external-files-path name="name" path="path" />
<external-cache-path name="name" path="path" />
<external-media-path name="name" path="path" />
...
</paths>

0x03 生成一个Uri

和其他 app 共享一个文件,你需要生成一个Uri。

1
2
3
4
5
6
7
8
9
File imagePath = new File(Context.getFilesDir(), "my_images");
File newFile = new File(imagePath, "default_image.jpg");

Uri uriForFile;
if (Build.VERSION.SDK_INT >= Build.VERSION_CODES.N) {
uriForFile = FileProvider.getUriForFile(mContext, mContext.getPackageName() + ".fileprovider", newFile);
} else {
uriForFile = Uri.parse("file://" + newFile.toString());
}

getUriForFile() 返回一个 content URI content://com.mydomain.fileprovider/my_images/default_image.jpg.

0x04 授予权限

1
2
3
shareContentIntent.setClipData(ClipData.newRawUri("", contentUri));
shareContentIntent.addFlags(
Intent.FLAG_GRANT_READ_URI_PERMISSION | Intent.FLAG_GRANT_WRITE_URI_PERMISSION);
  1. Put the content URI in an Intent by calling setData().
  2. Call the method Intent.setFlags() with either Intent.FLAG_GRANT_READ_URI_PERMISSION or Intent.FLAG_GRANT_WRITE_URI_PERMISSION or both.
  3. Send the Intent to another app. Most often, you do this by calling setResult().

0x05 提供Uri给其他app

1
2
3
4
5
// 使用uri
Intent i = new Intent(Intent.ACTION_VIEW);
i.setFlags(Intent.FLAG_GRANT_READ_URI_PERMISSION);
i.setDataAndType(uriForFile, "application/vnd.android.package-archive");
mContext.startActivity(i);

Problems专题:Provider

Problems专题:Provider

0x01 FileProvider:Failed to find configured root that contains /…/**.jpeg

1
2
3
4
5
6
7
8
9
10
11
12
13
14
15
16
17
18
19
20
21
java.lang.IllegalArgumentException: Failed to find configured root that contains /storage/emulated/0/DCIM/Camera/**.jpeg
at androidx.core.content.FileProvider$SimplePathStrategy.getUriForFile(FileProvider.java:800)
at androidx.core.content.FileProvider.getUriForFile(FileProvider.java:442)
at com.luck.picture.lib.tools.PictureFileUtils.parUri(PictureFileUtils.java:533)
at com.luck.picture.lib.PictureBaseActivity.startOpenCameraImage(PictureBaseActivity.java:705)
at com.luck.picture.lib.PictureSelectorActivity.startCamera(PictureSelectorActivity.java:926)
at com.luck.picture.lib.PictureSelectorActivity.onTakePhoto(PictureSelectorActivity.java:1473)
at com.luck.picture.lib.adapter.PictureImageGridAdapter.lambda$onBindViewHolder$0$PictureImageGridAdapter(PictureImageGridAdapter.java:155)
at com.luck.picture.lib.adapter.-$$Lambda$PictureImageGridAdapter$0EODmJcP4VP0lqmkEhQ1dzLbHi8.onClick(Unknown Source:2)
at android.view.View.performClick(View.java:6608)
at android.view.View.performClickInternal(View.java:6585)
at android.view.View.access$3100(View.java:785)
at android.view.View$PerformClick.run(View.java:25921)
at android.os.Handler.handleCallback(Handler.java:873)
at android.os.Handler.dispatchMessage(Handler.java:99)
at android.os.Looper.loop(Looper.java:201)
at android.app.ActivityThread.main(ActivityThread.java:6810)
at java.lang.reflect.Method.invoke(Native Method)
at com.android.internal.os.RuntimeInit$MethodAndArgsCaller.run(RuntimeInit.java:547)
at com.android.internal.os.ZygoteInit.main(ZygoteInit.java:873)
Back traces end.

问题分析

  1. FileProvider 路径配置文件被互相覆盖
  2. FileProvider 路径配置文件id重复,导致覆盖

解决方案

Kotlin单例

Kotlin单例

下面介绍一下kotlin 线程安全的几种单例写法。

0x01 饿汉模式

1
2
3
// Kotlin实现
object Singleton {
}
1
2
3
4
5
6
7
8
9
10
11
12
// 反编译Kotlin实现的Java代码
public final class Singleton {
public static final Singleton INSTANCE;

private Singleton() {
}

static {
Singleton var0 = new Singleton();
INSTANCE = var0;
}
}

0x02 双重校验锁式

双重校验锁式(Double Check)

1
2
3
4
5
6
7
8
9
10
11
12
13
14
15
16
17
18
19
// Kotlin实现
class Singleton private constructor() {
companion object {
@Volatile
private var instance: Singleton? = null

@JvmStatic
fun getInstance(): Singleton {
if (instance == null) {
synchronized(Singleton::class.java) {
if (instance == null) {
instance = Singleton()
}
}
}
return instance!!
}
}
}
1
2
3
4
5
6
7
8
9
10
11
12
13
14
15
16
17
18
19
20
21
22
23
24
25
26
27
28
29
30
31
32
33
34
35
36
37
38
39
40
41
42
43
44
45
46
47
48
49
50
51
52
53
54
// 反编译Kotlin实现的Java代码
public final class Singleton {
private static volatile Singleton instance;
public static final Singleton.Companion Companion = new Singleton.Companion((DefaultConstructorMarker)null);

private Singleton() {
}

// $FF: synthetic method
public Singleton(DefaultConstructorMarker $constructor_marker) {
this();
}

@JvmStatic
@NotNull
public static final Singleton getInstance() {
return Companion.getInstance();
}

public static final class Companion {
@JvmStatic
@NotNull
public final Singleton getInstance() {
if (Singleton.instance == null) {
Class var1 = Singleton.class;
boolean var2 = false;
boolean var3 = false;
synchronized(var1) {
int var4 = false;
if (Singleton.instance == null) {
Singleton.instance = new Singleton((DefaultConstructorMarker)null);
}

Unit var6 = Unit.INSTANCE;
}
}

Singleton var10000 = Singleton.instance;
if (var10000 == null) {
Intrinsics.throwNpe();
}

return var10000;
}

private Companion() {
}

// $FF: synthetic method
public Companion(DefaultConstructorMarker $constructor_marker) {
this();
}
}
}

0x03 静态内部类

1
2
3
4
5
6
7
8
9
10
11
12
//Java实现
public class SingletonDemo {
private static class SingletonHolder{
private static SingletonDemo instance=new SingletonDemo();
}
private SingletonDemo(){
System.out.println("Singleton has loaded");
}
public static SingletonDemo getInstance(){
return SingletonHolder.instance;
}
}
1
2
3
4
5
6
7
8
9
10
11
// Kotlin实现
class Singleton private constructor() {
companion object {
@JvmStatic
fun getInstance() = SingletonHolder.instance
}
private object SingletonHolder {
@JvmStatic
val instance: Singleton = Singleton()
}
}
1
2
3
4
5
6
7
8
9
10
11
12
13
14
15
16
17
18
19
20
21
22
23
24
25
26
27
28
29
30
31
32
33
34
// 反编译Kotlin实现的Java代码
public final class Singleton {
public static final Singleton.Companion Companion = new Singleton.Companion((DefaultConstructorMarker)null);
private Singleton() {
}
@JvmStatic
@NotNull
public static final Singleton getInstance() {
return Companion.getInstance();
}
private static final class SingletonHolder {
@NotNull
private static final Singleton instance;
public static final Singleton.SingletonHolder INSTANCE;
@NotNull
public static final Singleton getInstance() {
return instance;
}
static {
Singleton.SingletonHolder var0 = new Singleton.SingletonHolder();
INSTANCE = var0;
instance = new Singleton((DefaultConstructorMarker)null);
}
}
public static final class Companion {
@JvmStatic
@NotNull
public final Singleton getInstance() {
return Singleton.SingletonHolder.getInstance();
}
private Companion() {
}
}
}

adb常用指令

adb常用指令指引

官网下载: http://adbshell.com/downloads

命令参考: http://adbshell.com/commands

Android官网adb介绍: https://developer.android.google.cn/studio/command-line/adb?hl=zh_cn

Mumu adb常用指令指引: https://mumu.163.com/help/20210513/35047_947512.html

0x01 查询和连接设备

1
2
3
4
5
6
7
8
9
10
11
12
13
14
15
16
17
18
## 连接/断开连接网络电视(同一个网段,默认端口号5555可以不填)
adb connect 170.2.10.20
adb disconnect 170.2.10.20

## 连接/断开本地模拟器
adb connect 127.0.0.1:7555
adb disconnect 127.0.0.1:7555

## 连接/断开连接手机(手机Wifi和电脑处于同一个网段)

$ adb tcpip 5555 # 通过USB链接,将ADB切换到TCP/IP模式,端口号 5555(手机重启后需要重新执行tcpip命令)
# restarting in TCP mode port: 5555
adb shell ip route # 查看当前手机IP,也可到手机Wifi设置中自行查看
adb connect 192.168.1.100:5555 # 在断开USB连接的情况下,通过IP可直接连接手机
adb disconnect 192.168.1.100:5555 # 断开连接

## 查询已连接设备列表
adb devices -l

0x02 adb服务器

在某些情况下,您可能需要终止 adb 服务器进程,然后重启才能解决问题。例如,如果 adb 不响应命令,就可能会发生这种情况。

1
2
3
4
5
6
7
8
## 停止adb服务
adb kill-server

## 启动adb服务
adb start-server

## 以root权限重启adb服务(需要可root设备)
adb root

0x03 指定设备操作

命令格式:adb -s <serialNumber> command,如:adb -s 127.0.0.1:7555 shell pm list package
可以通过 adb devices 获取目标设备的serialNumber

1
2
3
4
5
6
$ adb devices
List of devices attached
emulator-5554 device
emulator-5555 device

$ adb -s emulator-5555 install helloWorld.apk

0x04 安装与卸载apk

1
2
3
4
5
## 安装apk
adb install C:\\xx.apk

## 卸载apk
adb uninstall C:\\xx.apk

0x05 已安装应用列表

所有应用包名列表

adb shell pm list packages

第三方应用包名列表

adb shell pm list packages -3

系统应用包名列表

adb shell pm list packages -s

根据某个关键字查找包

adb shell pm list packages |grep tencent

查看包安装位置

adb shell pm list packages -f |grep tencent

0x06 获取设备当前显示应用的包名和Activity

1
2
3
4
5
6
7
8
9
10
11
12
## 正在运行应用包名和Activity
$ adb shell dumpsys window | findstr mCurrentFocus
mCurrentFocus=null
mCurrentFocus=Window{fe571d0 u0 com.zhongduomei.rrmj.society/com.rrtv.rrtvtrunk.main.presentation.MainActivity}

## 设备当前显示应用的包名和Activity名称
$ adb shell dumpsys window w |findstr \/ |findstr name=
mSurface=Surface(name=NavigationBar0)/@0xe825312
mSurface=Surface(name=StatusBar)/@0x2a132d5
mSurface=Surface(name=com.tencent.qqlive/com.tencent.qqlive.ona.activity.SplashHomeActivity)/@0xc6af35b
mSurface=Surface(name=com.android.systemui.ImageWallpaper)/@0x65b6a37

0x07 启动应用

adb shell am start -n 应用包名/应用Activity类名

若想查看启动应用耗时,则可使用adb shell am start -W 应用包名/应用Activity类名

0x08 关闭应用

adb shell am force-stop 应用包名

0x09 查看应用版本号

adb shell dumpsys package 应用包名 | findstr version

0x10 清理应用数据

adb shell pm clear 应用包名

0x11 模拟输入

按键输入

adb shell input keyevent 键值

如:adb shell input keyevent 3表示按下HOME键,其他键值对应键位可网上搜索

字符输入

adb shell input text 字符

如:adb shell input text test则表示输入了test字符串

ps:字符不支持中文

鼠标点击

adb shell input tap X Y

X Y分别为当前屏幕下的x和y轴坐标值

鼠标滑动

adb shell input swipe X1 Y1 X2 Y2

X1 Y1 和X2 Y2分别为滑动起始点的坐标

0x12 从电脑上传文件至模拟器

adb push myfile.txt /sdcard/myfile.txt

0x13 从模拟器复制文件至电脑

adb pull /data/test.apk D:\

0x14 截图

将模拟器当前显示截图

adb shell screencap /data/screen.png

将截图文件下载至电脑

adb pull /data/screen.png C:\

0x15 录制视频

开始录制

adb shell screenrecord /data/test.mp4

结束录制

可按CTRL+C结束录制

导出视频文件

adb pull /data/test.mp4 C:\

0x16 查看设备信息

1
2
3
4
5
6
7
8
9
10
11
12
13
14
15
16
17
18
19
20
21
22
23
24
## 设备型号
$ adb shell getprop ro.product.model

## 设备品牌
$ adb shell getprop ro.product.brand

## 设备处理器型号
$ adb shell getprop ro.product.board

## 设备安卓版本号
$ adb shell getprop ro.build.version.release

## 设备abi
$ adb shell getprop ro.product.cpu.abi

## 设备cpu信息
$ adb shell cat /proc/cupinfo

## 设备引擎渲染模式
$ adb shell dumpsys SurfaceFlinger|findstr "GLES"

## grep product关键字(设备支持的abi列表)
$ adb shell getprop |grep product

0x17 管理设备

命令 功能
adb get-state 判断设备状态
adb devices 显示连接到计算机的设备
adb get-serialno 获取设备的序列号
adb reboot 重启设备
adb reboot bootloader 重启设备进入fastboot模式
adb reboot recovery 重启设备进入recovery模式

APK签名之签名文件的生成和查看

APK签名之签名文件的生成和查看

0x01 keytool生成签名文件

进入 JDK/bin,输入命令:

1
keytool -genkey -alias 密钥别名 -keyalg RSA -keysize 1024 -validity 36500 -keystore D:\test.jks -storetype pkcs12

参数说明:

-genkeypair 生成一条密钥对(由私钥和公钥组成)
-keystore 密钥库名字及存储位置(默认当前目录)
-alias 密钥对的别名(密钥库可以存在多个密钥对,用于区分不同密钥对)
-validity 密钥对的有效期(单位:天)
-keyalg 生成密钥对的算法(常用 RSA/DSA ,DSA 只用于签名,默认采用DSA )

提示:可重复使用此命令,在同一密钥库中创建多条密钥对

0x02 使用AndroidStudio工具生成jks签名文件

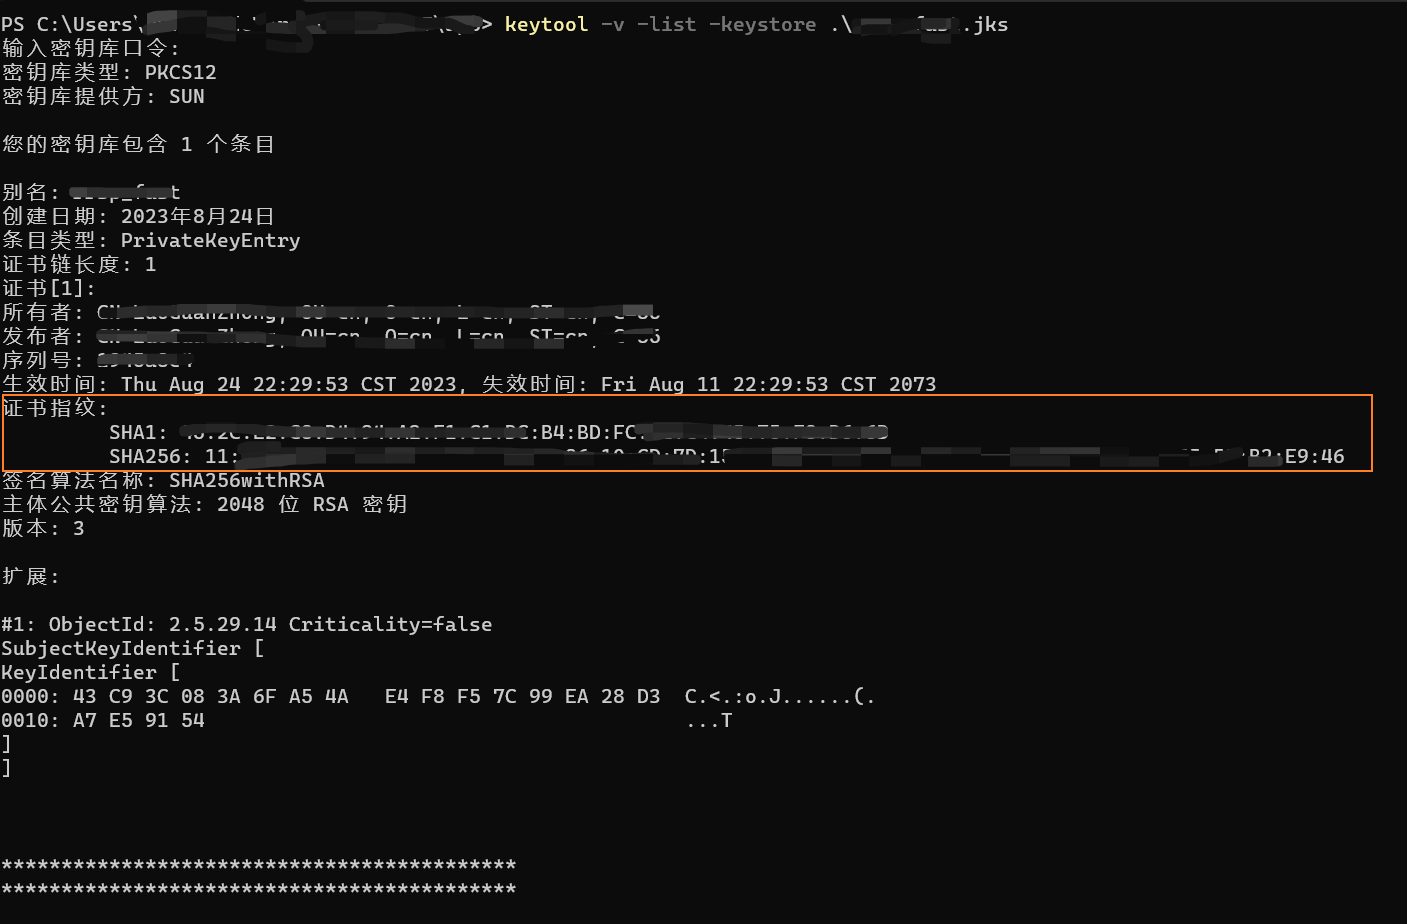
0x03 查看签名文件信息

0x0301 keytool工具查看签名信息

进入 JDK/bin,输入命令:

1
keytool -v -list -keystore D:\test.jks

20230907120940

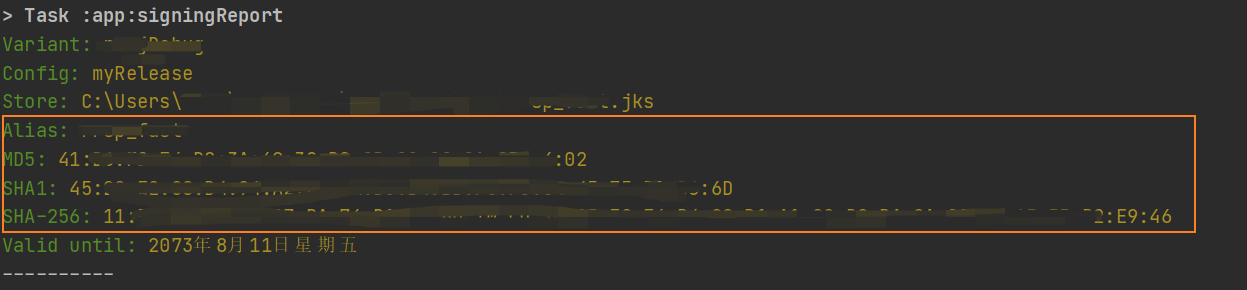
0x0302 signingReport查看签名MD5

部分应用商店需要签名文件的md5,在 AndroidStudio 中执行gradlew命令

1
2
3
gradlew signingReport

gradlew :app:signingReport ## 只打印APP的签名信息

20230907121556

Your browser is out-of-date!

Update your browser to view this website correctly.&npsb;Update my browser now

×